Raspberry Pi Power, Video, & USB
http://nordicgroup.us/rpi/power/
Power Supplies & Cables, Motorola Lapdock Instructions, Video, USB Hubs, BeagleBone, Udoo, Data Acquisition Boards
Last Update: 14 August 2013
Table of Contents
Problem
Novice Raspberry Pi users will often find themselves tearing their hair out over a Raspberry Pi board that reboots, or behaves erratically, for no apparent reason, even when using a 5VDC power supply that is able to provide sufficient current, according the board specifications. Unfortunately, the power distribution system of the Raspberry Pi is a weak point of the board and it was obviously designed by herbal-tea-drinking software engineers, not by experienced hardware engineers.
Eleven Raspberry Pi Power Issues
1. In order to save on manufacturing costs, the Raspberry Pi designers chose to use a Micro-USB jack as the power connector for the board. They tout this decision as enabling the use of low cost phone chargers as power supplies; the reality is, that technically, this was a horrific scheme. Micro-USB was not designed for high current applications, especially where voltage levels need to be tightly controlled. Charging a 3.7V Li-Ion battery can be achieved at even 4.5V but a Raspberry Pi starts operating erratically below 4.75V.
The Alpha board of the Pi did use a barrel jack and had on board regulation, but this design was deemed to be too costly for mass production due to the cost of the regulator and the cost of the barrel jack. Other single-board computers, such as Arduino and Beagleboard, can use a standard 5.5mm/2.1mm barrel jack which is designed for higher currents (they can also be powered via USB).
2. High current power supply units (PSUs) that have a Micro-USB plug, were not easily available when the Raspberry Pi launched. Raspberry Pi users were told to "just use a phone charger" which was ghastly advice since many phone chargers do not supply sufficient current for a Raspberry Pi. This problem has been mitigated due to the advent of after-market power supplies for tablets that can put out 2.4A at 5.2V (12 watts). The extra 0.2V mitigates the effect of the voltage drops in the cable and on the Raspberry Pi board.
3. The Raspberry Pi documentation does not make the current requirements clear. While the Pi model B will operate with a 5V, 700mA supply, if you plug in bus-powered USB devices, or expansion boards, the current requirements are greater; how much greater depends on the type of USB device and the type of expansion board.
4. There is a 1.1A polyfuse, F3, on the Raspberry Pi that limits total input current to 1.1 amps. So even if you have a supply that's able to provide more current than 1.1A, it won't help you, at least not directly. However a higher current supply could power the Raspberry Pi along with some external devices like a USB hub, eliminating the need for multiple power supplies. Some people have replaced the factory installed polyfuses with higher rated ones. You can also use a higher current supply and connect it to one of the USB-A ports or to the GPIO power pins and bypass the 1.1A polyfuse.
5. Polyfuses experience significant voltage drop as they approach their rated current. F3 on the Raspberry Pi will often be close to the maximum rated current if you are using any high current USB devices or if you have plugged in expansion boards. For example, one user measured 5.05V at the USB connector on the Raspberry Pi, 4.80V at the input to F3, but only 4.64V on the other side of F3 (TP1 to TP2). There was 160mV loss across the Polyfuse plus another 250mV of loss between the USB connector and the Polyfuse. He replaced the 1.1A Polyfuse with a 1.6A Polyfuse which reduced the loss across the Polyfuse from 160mV to 50mV. See http://pksato.blogspot.com/2012/12/replacing-polyfuses-of-raspberry-pi.html. Note that early Raspberry Pi boards also had a 140mA polyfuse on each USB port, making the USB ports essentially useless for anything other than a keyboard or mouse (or an externally powered USB hub). However the designers later removed these two fuses.
6. Cheap Micro-USB cables use thin, 28 AWG wires for all the conductors which result in significant resistive losses in the cable. Better cables are available but many non-hardware engineers don't understand the significant difference between cables and why a $6 cable is better than a $1 cable. This is not the fault of the Raspberry Pi designers, but they should have never chosen to power the board through the Micro-USB port.
7. The power circuitry on the Raspberry Pi was not designed to tolerate the losses resulting from Micro-USB cables and connectors. There have been several iterations of the power circuitry on the Raspberry Pi in an attempt to fix the power issues, but there are still issues.
8. The HDMI port on the Raspberry Pi does not provide sufficient current to power many HDMI to VGA converters, so if you want to use an HDMI to VGA converter you must buy one that has its own power supply or risk damaging the Raspberry Pi.
9. The USB ports on the Raspberry Pi do not provide sufficient current to operate many USB devices, nor is there sufficient power to power an unpowered USB hub. Hence you must be very careful when choosing USB devices or plug the devices into a powered hub with its own power supply.
10. The Raspberry Pi Micro-USB power port is fragile and a USB cable should not be continually plugged and unplugged.
11. Prior to rev 2.0 (and late production rev 1.0) you could not power a Raspberry Pi through one of the full size USB-A ports because there was a 140mA polyfuse on each port. Now it is permissible to power the Raspberry Pi through one of these ports. See http://www.raspberrypi.org/archives/tag/polyfuses. Of course you lose the use of the port for a USB device if you do this.
As a result of the flawed power distribution on the Raspberry Pi it's not unusual to see Raspberry Pi setups where there are five separate power supplies, one for the Raspberry Pi, one for the video monitor, one for the USB hub, one for the HDMI to VGA converter, and one for external speakers. If they had added a couple of dollars to the manufacturing cost, they could have enabled the use of a high-current power supply that eliminated the need for a powered hub, powered HDMI converter, and powered speakers. If you go to a Raspberry Pi meet-up, be sure to bring a power strip (or two).
Solution

The short answers:
The long answers:
1. Use a 12W, 5.2V, 2.4A supply. The extra 0.2V allows for some resistive losses while the 2.4A provides plenty of current for a Raspberry Pi that is using high-current devices on the USB ports. Well not really. Polyfuse F3 is 1.1A, so you can't put more than 1.1A through the Raspberry Pi no matter how much current the power supply can provide. However, by using a higher current supply you could power the Raspberry Pi, a USB hub, and even an HDMI to VGA converter from one power supply by making up a custom cable. Some Raspberry Pi owners have replaced the 1.1A Polyfuse with a higher current Polyfuse, which involves surface-mount soldering.
These supplies cost $6-7 including shipping. They are after-market supplies that were designed for charging the iPad and they provide 5.2V at 2.4A. They are made by Flextronics for Apple (or are counterfeit):
· US plug: http://dx.com/s/168549.
· AU plug: http://dx.com/s/168785.
· EU plug: http://dx.com/s/168553.
· UK plug: http://dx.com/s/168541.
These supplies are a better choice than the Adafruit 5.25V/1A power supply (http://www.adafruit.com/products/501), though they are tad more expensive. As a bonus, you can charge tablets with these supplies (for some Android tablets, like the Nexus 7, you may need to fabricate a custom cable with the data pins seen by the tablet shorted together which indicates to the tablet that it can draw the maximum current from the charger or you can purchase this power-only cable: http://www.amazon.com/dp/B0088HTYUE).
2. Avoid poor quality Micro-USB cables. Purchase cables that use 22 AWG wire for +5V and GND. The el-cheapo 99¢ Micro-USB cables will typically use 28 AWG wire for all the pins, or will use 26AWG wire for the power pins.
Larger gauge wire (smaller AWG number) for the power wires means lower resistive losses. See http://www.newegg.com/Product/Product.aspx?Item=N82E16812189234 for the Link Depot MUSB-6-22AWG 6 ft. USB 2.0 Type A Male to Micro USB 5-pin Male Cable M-M. Monoprice sells some 28AWG/24AWG Micro-USB cables which are also good, but remember, the resistance per distance unit for 24AWG wire is still more than 50% higher than it is for 22AWG wire.
3. Do not exceed 6 feet or 2M in length for 22AWG Micro-USB cables. Do not exceed 3 feet or 1M in length for 24AWG Micro-USB cables.
4. Power the Raspberry Pi through its full-size USB ports. This used to be unacceptable because of polyfuses on the USB ports, but these polyfuses are not present on current production.
5. Do not simultaneously power the Raspberry Pi from the Micro-USB power port and from one of the full size USB ports. This is very important. If you are using USB peripherals that have their own power supply and that provide power on their USB port then you should construct a signal-only USB cable where the power and ground wires are cut. If you are plugging a powered hub into the Raspberry Pi then the hub must not be providing +5V back to the Raspberry Pi. Some hubs work as either powered or unpowered hubs so they will provide power back to the Raspberry Pi when being powered by their own power supply.
6. Use a Raspberry Pi Power Port Protector which is just a Micro-USB male-female adapter, http://www.mcmelectronics.com/product/83-11874.
7. Another power supply option is to buy a 5V/4A power supply with a 5.5mm/2.1mm plug, cut off the plug, and splice in three inches or so of the 22AWG Micro-USB cable from Newegg (http://www.newegg.com/Product/Product.aspx?Item=N82E16812189234). Search for LFS054000D-A8S which is a power supply that Verizon included with a network hub. There are a lot of them around at prices ranging from $6 to $20 (http://www.amazon.com/gp/product/B008NTJWF4). It's a popular supply for Arduino and Beaglebone boards because it already has the proper connector.
You can cut off existing barrel connector and splice on multiple power cables, with the appropriate connectors, to power the Raspberry Pi, a USB hub, an HDMI to VGA converter, laptop hard drives, etc., and expansion boards that would normally require a separate 5 volt supply. Be certain to use cables with sufficient gauge wire (22AWG for USB cables).
8. Some Raspberry Pi users power the board through the 5V GPIO pins which bypass the Polyfuse and the associated voltage drops. You lose the protection of the Polyfuse.
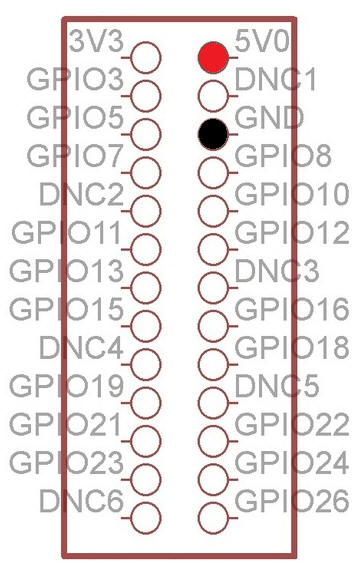
The GPIO Connector Has +5VDC and Ground Pins Which Bypass the Polyfuse
9. Those comfortable with surface mount soldering may wish to follow the lead of the person at http://pksato.blogspot.com/2012/12/replacing-polyfuses-of-raspberry-pi.html who replaced the existing polyfuses with higher rated ones. Polyfuses increase in resistance as the current flow increases to a level near the maximum rating so even if the current consumption does not increase on the Raspberry Pi, a higher rated polyfuse will result in less voltage drop across the polyfuse.
10. If you're doing hardware development, don't mind doing a little soldering, I suggest buying a $3.95 DPS-129AB supply from MPJA so you can run everything off of a single power supply. http://www.mpja.com/33V5V12V-130W-1U-Delta-DPS-129AB-Server-Supply/productinfo/17602%20PS/. These are very high quality power supplies that provide +5, +3.3, +12, and -12 volts. If you connect the +5V sense wire to the +5V wire near the Micro-USB male connector for the Raspberry Pi then you will have a solid +5V at the power connector. These supplies are rather large and the tiny fan operates at high speed so it's quite noisy. They've gone from several thousand in stock down to about 300.
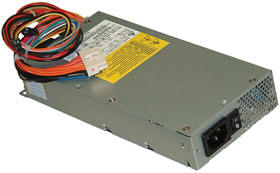
DPS-129AB
11. You can power a Revision 2.0 Raspberry Pi through one of the full-size USB-A ports. They warn you to not use a power supply capable of more than 2.5A. There are safety and legal reasons for this, not electrical reasons. If there were a failure on the board, or on something plugged into the board, excessive current could cause a fire. This method bypasses the polyfuse F3. See http://www.raspberrypi.org/archives/tag/polyfuses.
Motorola Lapdock Considerations
There is no need to modify the Lapdock, nor is there a need to trim plastic off the cables in order to use a Lapdock. However at least one of the cables should be modified electrically.
The short answer: The Motorola Lapdock is the best option for a Raspberry Pi console, combining an HDMI monitor, keyboard, trackpad, USB hub, and Li-Ion rechargeable battery. You just need to order the proper cables from China.
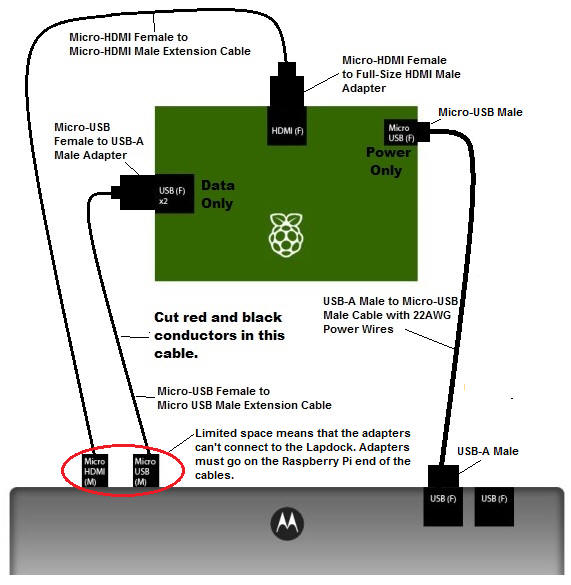
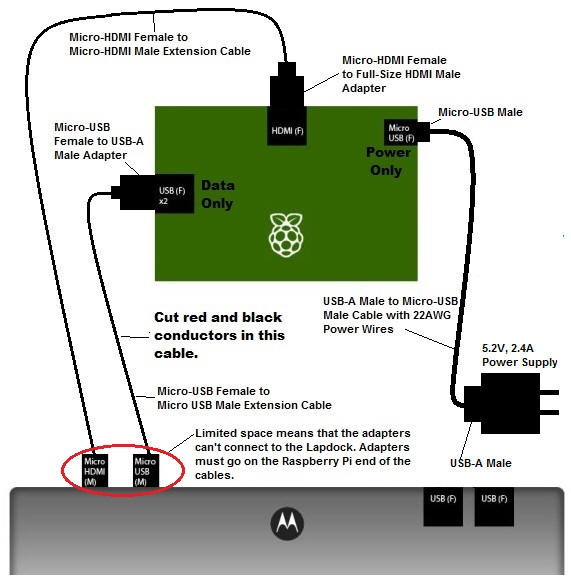
The Motorola Lapdock is a popular HDMI monitor/keyboard/trackpad/USB hub/speaker combination for the Raspberry Pi. It was intended for use with Motorola smart phones. It has a Micro-USB male connector and a MIcro-HDMI male connector, two full-size USB ports, keyboard, trackpad, speakers, HDMI monitor, and Li-Ion battery. You need to be aware of several issues:
1. The Micro-USB power connector on the Raspberry Pi is for power only, the data pins are not used. You can't just run a Micro-USB extension cable from the Micro-USB male connector on the Lapdock to the Micro-USB female connector on the Raspberry Pi--the keyboard and trackpad on the Lapdock will not be connected to the Raspberry Pi.
2. You shouldn't connect the Micro-USB male connector on the Lapdock to one of the Raspberry Pi's full-size USB ports and attempt to power the Raspberry Pi through one of the USB ports. It may work, but it will often be flakey because of the voltage drops in the cable.
3. Never power the Raspberry Pi from two supplies at the same time. This means that if you are properly powering the Raspberry Pi from the Micro-USB power connector, or from the GPIO pins, you should not also be powering the Raspberry Pi from one of the full-size USB ports.
4. If you choose the proper cables and adapters there is no need to trim the plastic on the connectors to get them to fit onto the Lapdock, nor are any modifications to the Lapdock necessary.
5. Use a Raspberry Pi Power Port Protector on the Lapdock (as well as on the Raspberry Pi) http://www.mcmelectronics.com/product/83-11874.
The proper way to use a Motorola Lapdock with a Raspberry Pi is the following:
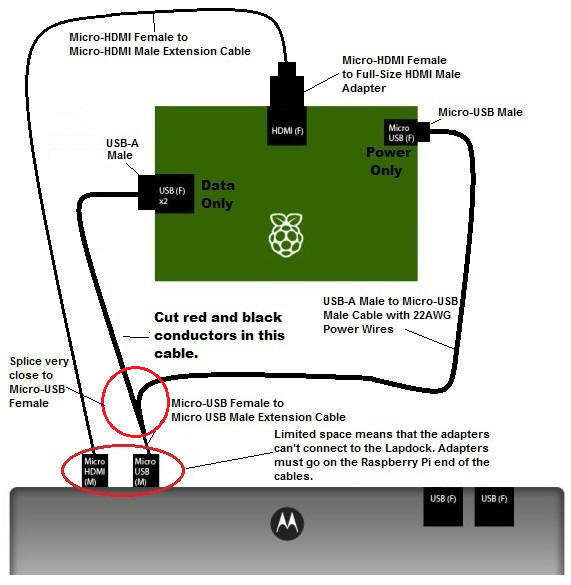
1. Connect a high quality (22 AWG) USB-A to Micro-USB cable from one of the Lapdock's full-size USB ports to the Raspberry Pi's Micro-USB power connector. If you don't want to use up one of the Lapdock's full size USB ports just for power, then you can power the Raspberry Pi from a separate power supply, but it's often more convenient to use the Lapdock for power.
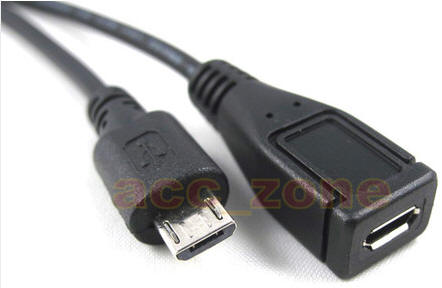
2. Connect a Micro-USB female to Micro-USB male extension cable, with the power wires cut to the Micro-USB male connector on the Lapdock and then use a Micro-USB female to USB-A male adapter, to connect the extension cables to one of the full-size USB ports on the Raspberry Pi. Do not use an adapter on directly on the Lapdock because there isn't space. Alternately, you can cut the Micro-USB male end off of the extension cable and splice a USB-A male end onto the cable (only the signal wires should be used, not the power wires). There is no such thing as a Micro-USB female to USB-A male cable, though you could easily fabricate one.
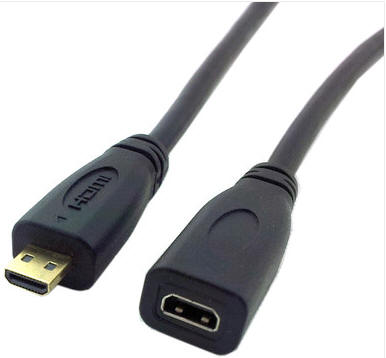
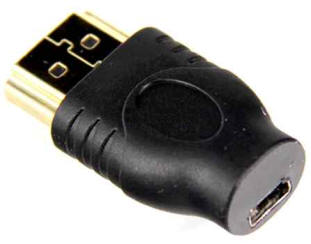
3. Connect a Micro-HDMI extension cable (Micro-HDMI female to Micro-HDMI male) to the HDMI male connector on the Lapdock and then use a Micro-HDMI female to full-size HDMI male adapter to connect the extension cable to the Raspberry Pi. Do not use an adapter on directly on the Lapdock because there isn't space.
4. The Motorola Lapdock uses a 19VDC/1.58A supply, with a 4.0 X 1.7 X 11MM barrel connector. If you're using a multi-output, power supply, like the DPS-129AB, with 12VDC out, then you could use a DC-DC converter module to step up 12VDC to 19VDC to eliminate the need for the separate Lapdock power supply. Many 4.0 X 1.7MM barrel connectors have a 9MM long barrel and will not work with the Lapdock; you need the 11MM long barrel.
Cables and Adapters for the Motorola Lapdock and the Raspberry Pi
There is no need to do any modifications to the Lapdock and there is no need to trim plastic off of the connectors on the cables IF you choose the proper cables and adapters.
You will need to purchase the following items on eBay or Deal Extreme, shipped from China:
Micro-USB Exrension Cable
· Search for "Micro USB Male To Female M/F Extension Cable" and try to find one that's 50cm-100cm in length. Also see http://dx.com/p/cy-u2-096-bk-micro-usb-male-to-micro-usb-female-connection-cable-black-50-cm-218390. Be sure that both ends are Micro-USB, one male, one female. The female end will connect to the Lapdock; the male end will connect to the Micro-USB female to USB-A male adapter. You will need to cut the power conductors in this cable. and you may want to just splice on a cable with a USB-A male plug at the same time.
· Micro HDMI Extension Cable (search for "Micro HDMI Male to Micro HDMI Female M to F Extension Cable 60cm"). Be sure that both ends are Micro-HDMI, one male, one female. The female end will connect to the Lapdock; the male end will connect to the Micro HDMI female to HDMI male adapter. The extension cable from Deal Extreme http://dx.com/p/d-type-micro-hdmi-male-to-female-extension-cable-for-motorola-xoom-black-60cm-175088 has those extra ears that you'd have to break off, but it may work.
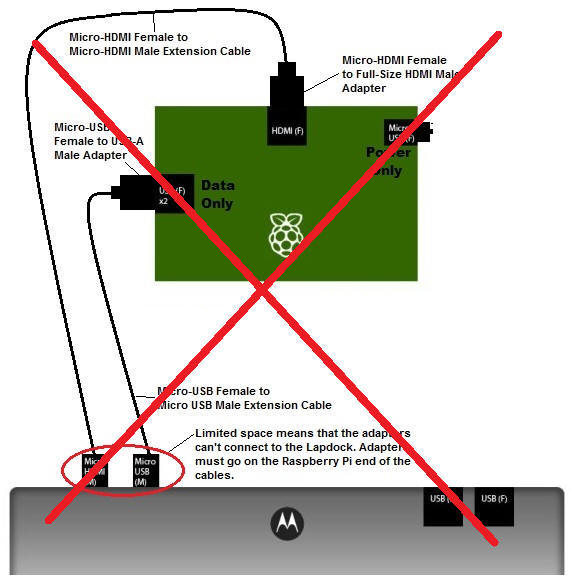
· Micro HDMI female to HDMI male adapter (search " Micro HDMI female to HDMI male adapter"). Also see http://dx.com/p/hdmi-male-to-micro-hdmi-female-adapter-66079. Be sure that it's Micro HDMI female to HDMI male, and not the other way around. This will plug into the Raspberry Pi, NOT the Lapdock, because of very limited space on the Lapdock. Do not think that you can use this adapter on the Lapdock and then a HDMI extension cable, it won't work because there is not sufficient space on the Lapdock for this big of an adapter.
· Micro-USB female to USB-A male adapter (search " Usb A/M male to micro usb b female connector adapter"). Also see http://dx.com/p/micro-usb-female-to-usb-male-adapter-black-172524. Be sure that it's Micro-USB female to USB-A male, and not the other way around. This will plug into the Raspberry Pi, NOT the Lapdock, because of very limited space on the Lapdock. Technically, this adapter is unnecessary if you're willing to cut off the male end of the Micro-USB extension cable and solder a USB cable with a USB-A male connector onto the end. You really need to cut the extension cable anyway so it's not a big deal. Do not think that you can use this adapter on the Lapdock and then a USB extension cable, it won't work because there is not sufficient space on the Lapdock for this big of an adapter.
|
|
|
|
Raspberry Pi Powered by Lapdock This works well but you use up a USB port for power so if you have more than one extra USB device then you'll need a hub |
Raspberry Pi Powered by External Supply Best option but it means carrying a power supply along. |
|
Best Connections for a Motorola Lapdock |
|
Remember, it is vitally important to cut the power connectors in the Micro-USB extension cable so that you are not powering the Raspberry Pi from two different sources at two slightly different voltages.
 |
 |
|
This will probably work if you use good cables Splice two cables onto the Micro-USB extension cable two inches from the Micro-USB female end. One cable with a USB-A male end for data (do not connect power wires), and one cable with 22AWG power and ground wires with a MIcro-USB male end (no need to connect data wires). This saves one USB port on the Lapdock. |
This is flakey! The Micro-USB male connector on the Lapdock, combined with the thin wires inside the Micro-USB extension cable, will result in too low of a voltage at the Raspberry Pi. It might work, but the Raspberry Pi may reboot for no apparent reason, especially if the other USB port on the Raspberry Pi is being used for something like a Wi-Fi adapter. However, according to the folks at Raspberry Pi, it is acceptable to power the board through one of the USB-A ports, and in fact it should work even better than using the Mirco-USB connector because polyfuse F3 is bypassed. I think that the problem is related to voltage drops at the Micro-USB connector on the Lapdock. This may actually work if you can find good cables. |
|
Other Connection Options for Motorola Lapdock |
|
The short answer: Buy a powered USB hub or use the USB ports on the Motorola Lapdock.
If you are using a powered USB hub with the Raspberry Pi (do not use unpowered hubs), connect the Raspberry Pi to the USB-B port of the hub with a USB-A male to USB-B male cable. You can power the Raspberry Pi from this port as well. But if you do power it from the hub, don't also power it from the Micro-USB jack.
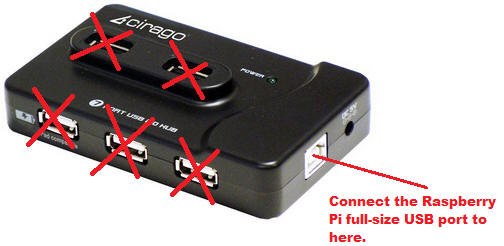
Some powered USB hubs have one high-current USB port which can be used to power the Raspberry Pi. For example the, hub pictured above, the Cirago USH1070, has one port that can provide up to 2A of current (the charging port does not have the data pins connected, it is ONLY for charging). See: http://www.amazon.com/dp/B007JGBUT8.
The Raspberry Pi provides HDMI audio/video out and composite video out. This is because these two modes are supported by the Broadcom CPU. Don't use composite video, it'll look awful. New Raspberry Pi users are often dismayed to find that there is no VGA output from the Raspberry Pi because they would like to use an old VGA monitor with the board. You can use an externally powered HDMI to VGA converter with any VGA monitor, but this is another expense.
The short answer: Buy a small HDMI video monitor with built-in speakers or use a Motrola Lapdock
HDMI
It is best to use an HDMI monitor or TV with built-in speakers with the Raspberry Pi. Video and audio will both be transmitted over a single HDMI cable from the Raspberry Pi to the monitor. This means fewer cables and no need for separate speakers. Definitely a minimalist solution that is well suited to the Raspberry Pi.
Many Raspberry Pi users prefer small monitors that are easy to carry around. Unfortunately, smallish HDMI TVs and monitors are not common and tend to be more expensive than 19" or larger monitors or televisions. Most monitors for aftermarket vehicle video systems are composite video only. There is a 9" monitor, "L0611 Milion Car 9" Digital Standalone Headrest Monitor Screen IR HDMI VGA Port," that sells for about $85. It requires a 12V power supply, not included.

See http://www.milion.com/details.aspx?pro_id=1207&product_no=L0611. Search for sellers on eBay. Ships from China. Not clear from the specs if it's 800x480 or 1024x768. Built-in speakers.
Amazon offers the 15.6" iView 1500 with a DVD player for $150. http://www.amazon.com/dp/B003NC8O14.
Walmart offers a 19" HDMI TV for $125. http://www.walmart.com/ip/20628109.
Walmart offers a 19" HDMI TV withs a DVD player for $128. http://www.walmart.com/ip/16935878.
There are several 19" HDMI TVs available for $110-130, i.e. the Seiki Digital SE19HY10 from Amazon http://www.amazon.com/dp/B00BXF7JCI.
Sigmac makes a 15" HDMI TV, model NE15AB, that Fry's has sold for as little as $70 but it appears to no longer be available. See http://sigmacusa.com/images/prodsheet_NE15AB.pdf.
The discontinued, but still available, Motorola Lapdock has a 10.1" screen, speakers, two USB ports, a keyboard, and a trackpad, as well as a built-in, rechargeable Li-Ion battery, and sells for about $80 new. You'll need to order some special cables and adapters from China, via eBay, for about another $15-20.
DVI
DVI is the digital video standard that's used with HDMI so DVI monitors can be used with an HDMI to DVI cable which is inexpensive http://dx.com/p/hdmi-to-dvi-24-1-cable-3-meter-1501, but you won't get audio. The Raspberry Pi does support analog audio out, but this involves more cables and separate speakers unless you can find a DVI monitor with integrated speakers. You can often find used 17" DVI monitors, with speakers, on craigslist.org, for $20-75. There are audio extractors for HDMI but they are very expensive, and of course they require another power supply
VGA
VGA monitors (VGA is analog) can be used with an HDMI to VGA (digital to analog) converter. If you use a converter, be certain to use one that has its own power supply. The Raspberry Pi HDMI port cannot provide sufficient current to power many HDMI powered HDMI to VGA converters, and the board can be damaged if you try. See the thread "Serious HDMI Problems. What's that smell? Burning Raspberry! " http://www.raspberrypi.org/phpBB3/viewtopic.php?f=28&t=9819. That said, some people have been able to use unpowered converters without damaging their board.
See http://www.amazon.com/dp/B003O55U8K for one $32 device that Raspberry Pi owners have used successfully. It has its own 5V/2A power supply and also provides analog audio from the HDMI signals.

Try to find a small VGA monitor that has built in speakers.
Again, the best solution is to use a small HDMI TV or monitor with built in speakers and avoid funky converters and extra cables; try to be a minimalist when it comes to the Raspberry Pi.
A similar board to the Raspberry Pi is the Beagle Bone Black.
Advantages
Disadvantages
Power Notes on the Beaglebone Black
USB Notes on the Beaglebone Black
HDMI Notes on the Beaglebone Black
HDMI support for the Motorola Lapdock is broken in the latest software image (0620). HDMI support for the Lapdock is available in the 0508 image.
Wi-Fi Notes on the Beaglebone Black
Many USB Wi-Fi dongles do not work with the official image for the Beaglebone boards. The popular Edimax EW-7811Un requires that you load the proper Realtek drivers. Fortunately this is easy to do. See http://nordicgroup.us/bbb/wireless/
Raspberry Pi & BeagleBone Versus Arduino
Some people view the Raspberry Pi and BeagleBone boards as Arduino replacements They are not. They are very different. Each has its pros and cons.
Arduino Advantages
Raspberry Pi and BeagleBone Inputs are NOT 5V Tolerant; Arduino's inputs are.
Raspberry Pi boards have no A/D converters, Arduino boards have A/D converters that can accept up to 5 volts, plus they have a separate analog reference voltage pin available. The Beaglebone does have A/D converters but they only accept up to 3.3V.
It is much easier to get started doing useful stuff on an Arduino board, especially if the project involves connection input sensors and output devices since often no extra circuitry is required, and even when it is required it's often just higher current driver chips. As a result of the Arduino's suitability for electronics projects, there's probably already code out there that's pretty close to what you want to do.
Arduino boards use much less power than Raspberry Pi or BeagleBone boards. Battery powered devices can be built with an Arduino board, but you would not want to build a battery powered devices with a Raspberry Pi or BeagleBone board.
Raspberry Pi & BeagleBone Advantages
Raspberry Pi and BeagleBone boards can run Linux and have a graphics controller so they do not require a another computer to use.
The CPU on the Raspberry Pi, and especially on the BeagleBone, is far more powerful than the processor on Arduino boards.
Wired networking is built in on the Raspberry Pi (model B) and on the BeagleBones.
The Best of Both Worlds: Raspberry Pi and Arduino Get Married

In the words of Hannah Montana, you can have "the best of both worlds."
You can plug an Alamode Raspberry Pi Plate board into the Raspberry Pi and, gain the Arduino functionality. See http://www.seeedstudio.com/depot/alamode-arduino-compatible-raspberry-pi-plate-p-1285.html.
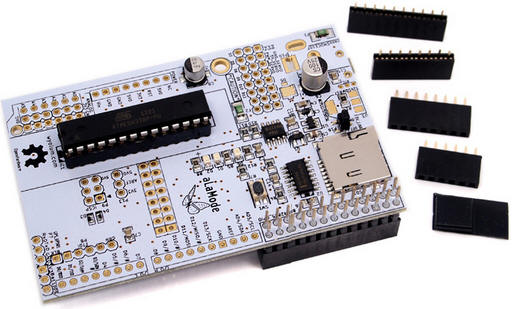
Raspberry Pi Plate Board
There is an upcoming board called the Udoo, which combines Arduino and Raspberry Pi functionality in a single board. See http://www.udoo.org/. Supposed to be available in October 2013. $99 to $129. Much more capable that a Raspberry Pi, without the need for a lot of additional hardware. It uses a 12V, 2A power adapter so hopefully it won't have all the power issues of the Raspberry Pi. However its GPIO pins will not be 5 volt tolerant. Not all Arduino shields will work.
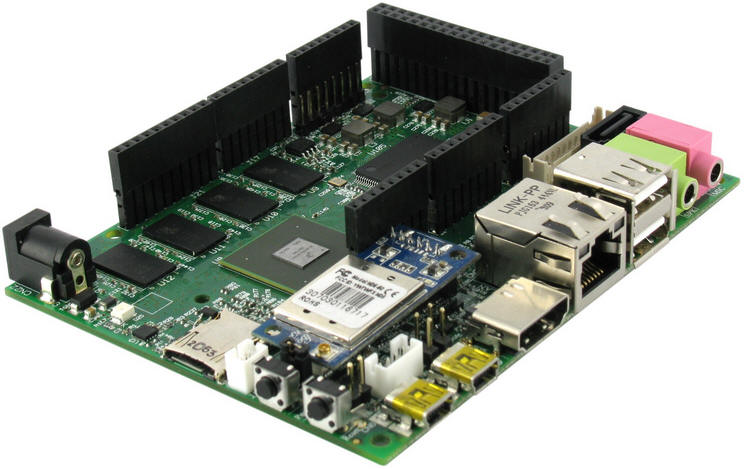
Udoo Board
While the Arduino can be used as a data acquisition board, remember that the inputs, both digital and analog, are limited to 0-5VDC (on the Arduino Due 0-3.3VDC). The Raspberry Pi is not well-suited for this application because its GPIOs are limited to 3.3V and there are no analog inputs at all. The BeagleBone boards do add analog inputs but are still limited to 3.3 volts. You can always add level translators and voltage dividers to get around the input and output limitations of these boards but it's probably more trouble than it's worth. Even the Gert board for the Raspberry Pi limits the input voltages on the GPIO pins to 3.3V.
Labjack, http://labjack.com, manufactures several low-cost boards that are more suited to data acquisition than Arduino, Raspberry Pi, or BeagleBone boards, without the need to add a lot of additional circuitry. For example, their U3-HV board costs $114 and has 4 analog inputs that can accept -10 to +20VDC signals, 4 digital-only I/O pins, and 12 pins that can be configured as digital I/O or analog inputs (0-5V). The board also supports SPI, I2C (using some of the I/O pins). It plugs into the USB port of a Windows or Linux machine and does not require a separate power supply. There is open source software as well as commercial software available to control the board. It can also be controlled by the Raspberry Pi.
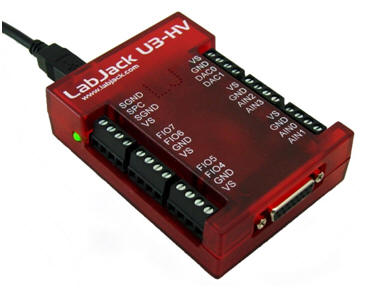
LabJack U3-HV
Questions? Comments? Send e-mail to rpipower at nordicgroup dot us. Replace at with @, replace dot with . and remove spaces. Include [rpipower] in the subject line.