Headlight
Mounting
The biggest challenge in a homebrew lighting
system is the headlight mounting to the bicycle. Prior to the popularity
of threadless headsets*, a front reflector bracket was standard equipment below
the big headset nuts, or could be easily added. This made an ideal mount for
headlights; it was ideally positioned, it facilitated a very secure mount, and
it did not add to handlebar clutter. It was usable on road bikes with taped or
foamed bars because it did not depend on a clamp that only worked with a
specific diameter of bars. Except for higher end touring and road bikes, most
new bikes now use the cheaper threadless headsets which cannot use the headset
mount reflector bracket. There are also brake bolt mount steel reflector
brackets that will work just as well, and plastic brackets that are okay for
lighter headlamps.
Note that all bicycles sold in the
U.S. still require a front reflector however the mounting may no longer be
sturdy enough to mount a headlight on. If it is a piece of steel attached the
brake bolt then it's fine. It it's a thin plastic loop clamp or other plastic
part, then forget it. Note that you can always buy a piece of aluminum bar and
build your own brake bolt mount bracket that fits your particular bike (just
bend the aluminum bar to the proper shape in a vise, and drill the appropriate
holes). Try to avoid using
radiator hose clamps.
*Try to avoid buying bicycles with
threadless headsets. The reason for these headsets is that it makes it easier
for bicycle manufacturers and shops because they no longer have to stock
different lengths of forks (they simply saw the fork to size). You lose height
adjustability of the handlebars with these headsets, unless you use a funky
extender. Threadless headsets are in the same category of aluminum tubing and
compact frames. They save money for the manufacturer, but they are bad for the
end user. Amusingly, now bike manufacturers are touting "adjustable
stems" as a feature, on bikes where they went back to threaded headsets.
Headlight Mounting to
Reflector Bracket
Remove the front reflector and mount the
headlight to the front reflector bracket via an insulator. This avoids the need for funky
handlebar clamps, and eliminates handlebar clutter. If your bike doesn't have a front reflector bracket then
you'll need to buy one at a bike store or come up with some other mounting
method. You can add a reflector bracket to threaded headsets but not to
threadless headsets (you will need a headset wrench). For the Micro Beam driving lights you may need to fasten it
to a rectangle of wood or metal to make the mounting holes line up with the
reflector bracket. The top of the line Nitto front rack has an integral mount
for a headlamp.
Click
Images for Details
|
|
 |

|
|
|
Click for Larger
Picture |
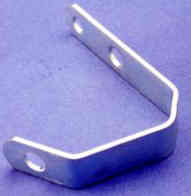
| Commercial reflector
bracket
for brake bolt. You can bend and drill your own from a section of aluminum flat (Home Depot). I don't know where you can buy one already made.
Avoid 90° bends in aluminum flat bar, follow the example above.
The bracket goes under the steering tube
and is fastened with a bolt through the brake bolt hole. Most forks
still have this hole, even though it isn't used for brakes any more
(some fenders use it).
|
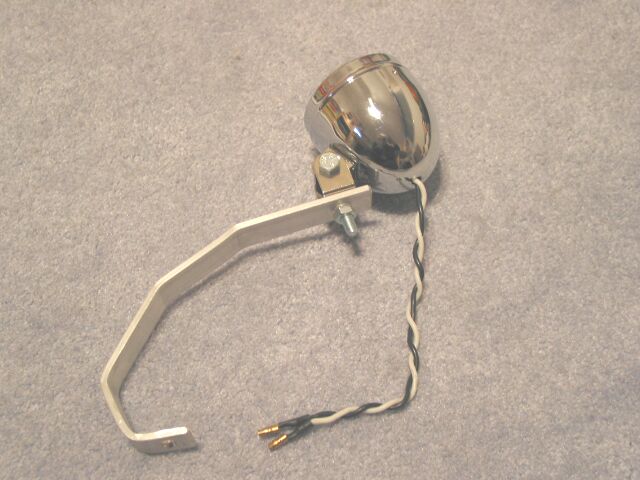
Home made reflector bracket
for brake bolt made from a piece of flat aluminum with a QH-7CC driving
light attached to it. Don't do 90 degree bends as this will weaken the
aluminum. The bend at the bottom of this bracket is about 65 degrees.
The bracket goes under the steering tube
and is fastened with a bolt through the brake bolt hole. Most forks
still have this hole, even though it isn't used for brakes any more
(some fenders use it).
|
Commercial reflector bracket
for a threaded headset. A bike shop will sell you this very cheaply if
they still have any! Not usable with threadless headsets which are on
most mountain and hybrid bicycles. |
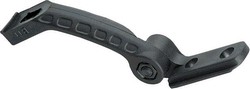
Dimension Front Reflector
Bracket. This would be fine for a single plastic sealed beam, or a
single MR16 or MR11 lamp, but
not much more. $2.95
from bikeman.com. |
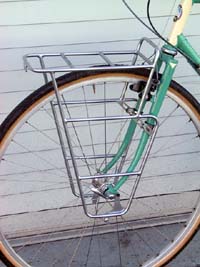
Nitto steel front
rack has a mount for a front headlamp. $128 |
This bicycle has
an old-fashioned headlight mounted to a threaded headset bracket. That
looks like a very useful bracket, but I have no idea where to buy such a
thing. This bicycle is a typical Japanese village bicycle so try a
bicycle shop in any small town in Japan. |
Headlight Mounting (Sealed
Beam Insulator)
You must fabricate a non-conductive mounting fixture that
screws onto the sealed beam through the holes in the tabs.
Basically you need a round circle of wood with two holes for the bolts for the
tabs and one hole for the bolt that goes through the hole in the reflector
bracket. The fork lugs from the headlight harness attach to the two bolts that
go to the tabs; this is how current goes to the headlight. Use 8/32 by 1/2"
to 3/4" long bolts. The headlight comes with
the right diameter screws but they are too short. However you need to use the
screws it comes with to tap holes into the tabs, then remove them and use the
longer screws.
|
|
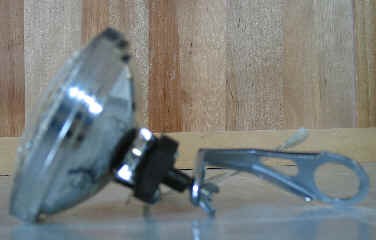
| 14W Sealed Beam attached to an
wood insulator (black), attached to a headset mount reflector bracket. A
wing lock-nut is used for easy on-off without any danger of the nut
vibrating loose. Simple, secure, very light, weatherproof, and not
clamped to the crowded handlebars. A brake bolt mount reflector bracket
could also be used. |
See the knob at http://store.yahoo.com/dlawlesshardware/woodknobsolb.html,
which may work, but the shipping is high. If you are doing a dual system then forget about this and just
use a rectangle of wood. Cover the wood with black heat shrink tubing if you
wish.
Click
Image for Details
My latest system is a dual 14W
system for which I used an 11" length of 2" wide oak strip that was
about $1 from Orchard Supply Hardware. I get about 1.75 hours of run-time with
both headlights and a 1.8W strobe, on a 12V 5AH sealed lead acid battery.
Recharging a completely discharged battery takes about six hours with a 900mA
charger.
Drill two holes in the flat part to match the holes on the sealed beam. Drill the center hole of the knob all the way through, countersink the top, and
insert a long bolt all the way through (before you fasten the sealed beam to the
knob). Then you use a lock nut (I used a wing lock nut) to secure the headlight
assembly to the front reflector bracket (bend the reflector bracket to aim the
light). If you don't have a front reflector bracket then you can buy one at a
bike store for a dollar or so, but all bikes sold in the U.S. have front
reflector brackets.
Mounting Lights and/or Switch Box and/or
Battery Box to Handlebars or Frame
If you want to mount the lights or switch box to
your handlebars then you will need some clamps.
Click
Images for Details
Self-Locking
Nylon Pipe Hanger
Remember,
when choosing the proper size that the McMaster catalog diameters are inner
diameters of the conduit or tubing. Measure the diameter of the tubing you're
using with a vernier caliper. Choose the outer diameter that is the
closest to the diameter of your tubing (choose a size equal to, or a bit smaller
than the diameter of your tubing). These clamps have an advantage over conduit
clamps because the attachment point is in the center. For example, if you want
to hang a 2" deep plastic enclosure from your top tube it will not be
possible with a U bolt or conduit clamp because they are too wide.
Tubing
diameter charts are at: http://www.alliedtube.com/html/ecd.htm
|
Trade
Size Designator Inner Diameter (for reference only)
|
Outer
Diameter (choose the size, smaller than, but closest to your tubing
size)
|
McMaster
Part # |
| ½"
GRC |
0.84"
(for 7/8" grip area handlebars) |
30075T3 |
| ¾"
EMT |
0.922"
(for 15/16" grip area handlebars) |
30075T16 |
| |
Threaded
Rod Adapter (nut) |
30075T21 |
U-Bolt
Choose stainless steel,
with mounting plate, 1/4"-20 thread size, with dimensions A=1.75",
B=1", C=1". Slip a piece of 1/4" rubber hose over the unthreaded
section. $12 for 5 pieces at McMaster.
Loop
Strap
These are available at hardware stores, or
from McMaster (must buy a package of 50 from McMaster).
Conduit
Clamps
These are available in the electrical section of hardware stores, i.e. Home
Depot. Use a strip of rubber to ensure a tight fit (or heat shrink a piece of
tubing around it). Steel clamps are also available. Remember that the size
printed on the package is for the INNER diameter of the conduit, a 1/2"
clamp is closer to 3/4", a 3/4" clamp is closer to 1". Conduit
clamps attached to a rectangle of aluminum or wood, with the lamps attached to
the rectangle, provide a secure, inexpensive mounting to the handlebars (some
spacers or extra nuts on longer bolts may be needed to clear the handlebar bolt
to the stem).
Zefal
Gizmo Clamp
Zefal
Gizmo Clamps are good for attaching accessories to the frame, but even the
smallest size is too large to use on the handlebars.
Round
Rail Clamps
These are used to secure fishing rods to 7/8" round rails on boats. Probably
about the most secure and painless way to attach a light fixture. Available with
1/2" threads. You will have to buy the proper length and
threading of bolt, as the bolts that come with driving lights are too long and
are probably threaded differently.
Commercial
Headlight Mounts
A variety of headlight mounting hardware can be seen and purchased from Peter
White Cycles. He has brackets that attach to the brake bolt of various
types of brakes, as well as a handlebar bracket. These brackets are designed for
Lumotec headlights, but you should be able to adapt them for your own use.
Return to http://bicyclelighting.com